If you have ever spent time meticulously applying eyeshadow only to have it disappear the moment you open your eyes, you are not alone. This is the classic struggle for those with hooded eyes. Mastering eye makeup for hooded eyes can feel like learning a secret code, but once you crack it, a whole new world of creative possibilities opens up. This isn’t about “fixing” your eye shape; it’s about learning techniques that enhance your unique beauty.
Hooded eyes are incredibly common and are seen on some of the world’s most famous faces, including Jennifer Lawrence, Blake Lively, and Taylor Swift. The defining feature is an extra layer of skin that droops over the crease, causing the mobile lid to appear smaller. Standard makeup tutorials often don’t work, as the techniques rely on a visible crease that simply isn’t there when the eye is open.
This comprehensive guide will demystify the process. We will cover everything from the essential products you need and a step-by-step eyeshadow tutorial to advanced tips for eyeliner and brows that create the illusion of a more lifted, open eye.
What Are Hooded Eyes?
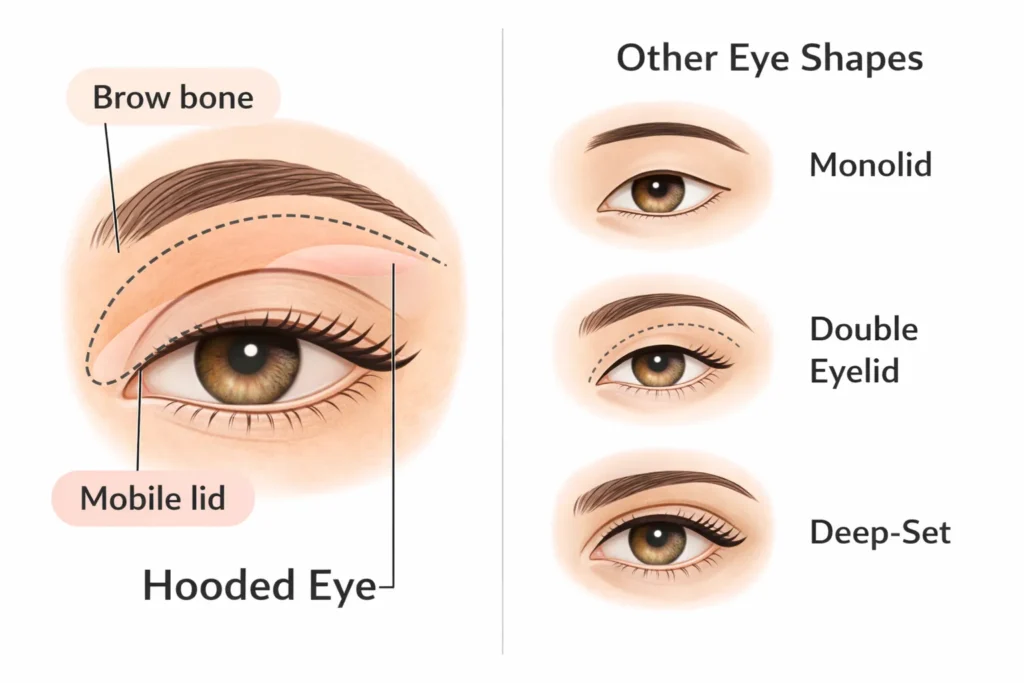
Before diving into techniques, it is important to confirm your eye shape. Hooded eyes are characterized by a heavy brow bone with a prominent fold of skin that hangs over the natural crease of the eye, making the mobile eyelid less visible.
How to Tell If You Have Hooded Eyes
- Look straight into a mirror. Keep your face relaxed and your eyes open naturally.
- Examine your crease. Can you see the crease in your eyelid?
- Check your mobile lid. Is a significant portion of your eyelid (the part that moves when you blink) covered by the skin below your brow bone?
If you answered “no” to seeing your crease and “yes” to your lid being covered, you likely have hooded eyes. This can be a genetic trait you have had your whole life, or it can develop with age as skin loses elasticity.
The Foundation: Essential Tools and Products
The right products can make or break your look, especially when dealing with the unique challenges of a hooded eye shape.
1. Eyeshadow Primer is Non-Negotiable
With hooded eyes, the skin on your mobile lid is constantly rubbing against the skin of your brow bone. This friction causes makeup to smudge, transfer, and crease.
- Why It’s Crucial: A high-quality eyeshadow primer creates a tacky, waterproof barrier that locks your eyeshadow in place all day. It prevents smudging and makes your colors appear more vibrant. Do not confuse this with concealer; a dedicated eye primer is essential.
2. Matte Eyeshadows are Your Best Friend
Shimmery or glittery eyeshadows reflect light. When applied all over a hooded eye, they can accentuate the puffiness of the brow bone and make the eye appear smaller.
- Why They Work: Matte eyeshadows absorb light, which allows you to create shadows and dimension. They are perfect for faking a crease and adding depth where you want it. Save your shimmer for specific, strategic placement.
3. Waterproof Eyeliner and Mascara
The risk of smudging is high. Your lashes often touch the skin of your upper lid, leading to mascara transfer (also known as “stamping”).
- Why They are Essential: Waterproof formulas are designed to resist moisture and oil, ensuring your liner stays crisp and your mascara stays on your lashes—not on your brow bone. A tubing mascara is also an excellent option as it forms tiny water-resistant “tubes” around your lashes that won’t smudge.
The Core Technique: Creating a Faux Crease
This is the most important skill to master for hooded eyes. Since your natural crease is hidden, you need to create a new one higher up.
Step-by-Step Eyeshadow Application
- Prime Your Eyes: Apply a thin layer of eyeshadow primer from your lash line all the way up to your brow bone. Let it set for a minute until it becomes slightly tacky.
- Set the Primer: Use a fluffy brush to apply a light, neutral matte eyeshadow (close to your skin tone) all over the primed area. This creates a smooth canvas for blending.
- Find Your Faux Crease: Look straight ahead into the mirror with your eye open. Your faux crease is the area just above your natural, hidden crease, on the lower part of your brow bone. This is the spot where you want to create the illusion of depth.
- Apply Your Transition Shade: Take a medium-toned matte eyeshadow (like a soft brown, taupe, or dusty rose) on a fluffy blending brush. With your eye open, start applying this color along your faux crease line, sweeping it back and forth in a windshield-wiper motion.
- Build Dimension: Blend this color upwards and outwards towards the tail of your eyebrow. The goal is to make the shadow visible when your eye is open. This technique visually “pushes back” the heavy part of the hood.
- Deepen the Outer Corner: Take a slightly darker matte shade on a smaller, denser blending brush. Concentrate this color on the outer third of your faux crease, forming a “V” shape from the outer corner of your lash line up to the crease. Blend well to avoid harsh lines.
- The Pop of Shimmer (Strategic Placement): Now for the fun part. Apply your shimmer, glitter, or light-colored shadow. The key is to place it only on the part of your mobile lid that is visible when your eye is open. For most hooded eyes, this is the inner half of the lid, near the lash line. Use your finger or a flat, dense brush to pat the color on for maximum impact. This draws light to the center of your eye, making it appear larger.
- Lower Lash Line: Lightly sweep your medium transition shade along your lower lash line to balance the look. Connecting this to your upper eyeshadow at the outer corner will further elongate the eye.
Eyeliner for Hooded Eyes: The Bat-Wing Technique
Applying a classic winged liner can be frustrating, as the wing often gets distorted or hidden by the hood. The “bat-wing” or “puppy liner” technique is a game-changer.
The Problem with a Traditional Wing
When you draw a straight wing with your eye closed, the line gets folded and crumpled by the hood when you open your eye, creating a strange-looking hook.
How to Create the Bat-Wing Liner
- Look Straight Ahead: Keep your eye open and relaxed, looking directly into the mirror.
- Draw the Bottom Line: Start by drawing the bottom edge of your wing. Extend a line from your outer corner, angling it up towards the tail of your brow. Make this line as long as you want your wing to be.
- Connect to the Lash Line: Now, draw a second line from the very tip of that wing, connecting it horizontally back to your lash line, ignoring the fold. This will create an empty, triangular shape.
- Fill It In: Fill in this shape. When your eye is open, it will look like a perfect, straight wing.
- The “Bat Wing” Reveal: When you close your eye, you will see a unique shape that looks like a little bat wing. This empty space is what allows the liner to look straight when the eye is open.
- Line the Lashes: Finish by drawing a very thin line along the rest of your lash line. A thick line across the lid will take up valuable space and make your eye look smaller, so keep it as thin as possible.
Brows and Lashes: The Lifting Finishing Touches
Your brows and lashes frame your face and play a crucial role in lifting the eye area.
Eyebrow Shaping
A well-shaped brow can create a significant lifting effect.
- The Arch: The goal is to create a higher, more defined arch. This visually pulls the eye area upward. The tail of the brow should extend outwards, not downwards, as a downward-sloping brow can make the eye look droopy.
- Fill Them In: Use a brow pencil or powder to fill in any sparse areas, concentrating on defining the arch and tail.
The Power of Curling Your Lashes
This is one of the quickest and most effective tips. Curling your lashes instantly opens up the eye.
- Technique: Get the curler as close to your lash root as possible and clamp down. Hold for 10 seconds. This creates a vertical lift that helps your lashes clear the hood.
Mascara Application
- Focus on the Center: Concentrate the majority of your mascara application on the lashes at the center of your eye. Wiggle the wand at the roots and pull straight up. This draws attention to the middle and enhances the wide-eyed effect.
- Use a Defining Formula: A mascara that lengthens and defines is often better than a heavy volumizing formula, which can create clumps that weigh the eye down.
Common Mistakes to Avoid
Part of learning the right eye makeup for hooded eyes is knowing what not to do.
- Applying Dark Shadow on the Mobile Lid: This makes the visible part of your lid recede, making the eye appear smaller. Keep the mobile lid light and bright.
- Closing Your Eye to Apply Crease Color: Always apply your faux crease color with your eye open, looking straight ahead. This is the only way to ensure the color will be visible.
- A Thick Line of Eyeliner: A thick band of liner across your upper lash line will completely cover what little lid space you have. Keep it super thin.
- Ignoring the Lower Lash Line: Leaving the lower lash line bare can make the heavy top lid look unbalanced. A little smudge of shadow below connects the look.
Conclusion
Mastering eye makeup for hooded eyes is a journey of unlearning standard techniques and embracing methods that celebrate your specific anatomy. It is not about fighting your eye shape, but about working with it to create light, shadow, and dimension in a way that is flattering for you.
Remember the key principles: prime your lids, create a new crease above your natural one with matte shadows, keep your eyeliner thin, and lift your lashes and brows. Once you have these basics down, you can play with colors, textures, and styles with confidence. Your hooded eyes are not a limitation; they are a unique canvas waiting for the right artist—and that artist is you.
Frequently Asked Questions (FAQs)
Q: Can I still do a cut crease with hooded eyes?
A: Yes! You just have to create a “floating” cut crease. Instead of cutting along your natural crease, you will carve out the shape higher up on your brow bone where it will be visible when your eye is open.
Q: Are false eyelashes a good idea for hooded eyes?
A: They can be fantastic, but the style matters. Avoid heavy, dense strip lashes that create a dark “shelf” and make the eye look smaller. Opt for wispy, flared styles that are longer in the center and shorter on the inner and outer corners. This helps to open the eye up.
Q: Does winged eyeliner work for everyone with hooded eyes?
A: The bat-wing technique works for most, but for very heavily hooded eyes where the fold comes down to the lash line, a “puppy liner” (where the liner slopes downwards instead of up) can be more flattering. Alternatively, a simple tightline (lining the upper water line) can define the eye without taking up any lid space.
Q: As I get older, my eyes are becoming more hooded. Do these tips still apply?
A: Yes, these techniques are perfect for mature, hooded eyes. Using matte eyeshadows is particularly important, as shimmer can settle into and emphasize fine lines. The focus on lifting the eye upwards is universally flattering for aging eyes.
Q: What are the best eyeshadow colors for hooded eyes?
A: Any color can work! The technique is more important than the specific color. However, many people find that using a palette of neutral mattes (browns, taupes, grays) is the easiest way to learn how to create dimension and shape.
Sofia Bennett is a fashion writer and style observer known for her clean sense of aesthetics and trend analysis. She has covered fashion shows, reviewed designer collections, and interviewed independent creators. Sofia specializes in connecting fashion with real-life lifestyle choices, helping readers understand what looks good — and why.